Welcome to my blog. I was inspired by the book, "Blogging for Bliss" by Tara Frey.

Welcome to my blog. I was inspired by the book, "Blogging for Bliss" by Tara Frey. My goal is to share a little about my life, and a lot about my longarm quilting business, Lone Tree Designs.

Wednesday, January 24, 2018

Quilt Design: Old School Style

A young couple with the baby quilt I designed
for them in their nursery colors.
   I am not a super creative person.  When it comes to quilting art, I am pretty good at taking someone else's creativity and "tweaking" it just a bit to make it my own.  I have a hard time following a pattern as written, mainly because I don't want my quilt to be exactly like anyone else's.  For this same reason, I rarely buy a kit, and if I do, I always make some changes by adding my own fabric or changing up the pattern.  I want my quilts to be "my" quilts, not a replica of someone else's quilt.
  One way to insure that a quilt is my own unique creation is to design my own pattern.  Early on in my quilting career, my mom taught me to take a piece of graph paper, use the squares on it for sizing, and draw up a quilt pattern.  After it was drawn up, she taught me how to figure the math so that I would know exactly what I needed to buy to make the quilt!  How fun!
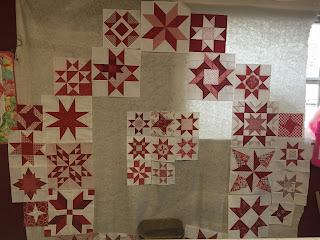
                                                                                          
Exchange blocks on the design wall for creative inspiration.

A quilt I designed for blocks from another
block exchange.
I have used this skill many times over the past 25 or so years to design blocks and quilts for the annual NIFS Shop Hop here in Nebraska for my mom's quilt shop in Kearney, NE. My block design was used for the AMB solids state quilt that went to Houston.  Some of my easy patterns have been published in a NE farm journal, and I have made a few patterns to sell.    The baby quilt on this page was designed originally for Shop Hop, and I have found that it can be used for all kinds of fast, fun quilts.  I made a modern one out of solids.  I made a Husker one for one of my husband's wrestlers who was in the hospital, and it works great for a baby quilt!
  The really great part about this baby quilt is that, because I designed it, I know there is not another like it anywhere.  It's a special gift!
  Another situation that sends me to my graph paper is designing for block exchange quilts.  Sure, I could find all kinds of patterns that would allow me to use my blocks, if they were all the same size.  But, it is a lot of fun to make up my own pattern.  The red and white blocks are a combination of 6", 9", and 12"...not an easy pattern to find.  I saw a quilt on Pinterest that inspired me to design a quilt for these blocks.  I will have plenty of white space to show off my quilting!  
  The quilt pattern on graph paper is one that I designed this week for a set of blocks that I won't be receiving until next January.  I knew the blocks would all be 12".  I also knew that I wanted to use flying geese in my setting.  I first decided on a size for my quilt.  Then, I drew my 12" blocks with 4" in between to allow for my flying geese.  As I was designing, I started to think about how I could place the geese in an unexpected and creative way.  I decided that they should follow each other all around the quilt.  With my quilt designed, I did the math, figured out how much fabric it would take for my flying geese and my lattice, and purchased what I needed.  Now, all I have to do is make roughly 250 flying geese before next January!  When the blocks are exchanged, I will have my geese and my design ready to go.
  There are computer programs out there to help you design quilts.  You can even plug in your exact fabric choices to see how it looks and the program will figure the math for you to tell you how much yardage to buy.  I have one of those programs, and have used it.  I prefer the graph paper.  It may be "old school" but there is just something I love about drawing it out, erasing, and drawing it again.  I like using my imagination to think about what it will look like with different fabrics in different places.  I think it's good for my mind to have to figure out the math for myself.  Don't get me wrong.  I love my computer and all the great things it can do for me, but when it comes to quilt design, I will continue to design "old school"!

Tuesday, January 9, 2018

Discovering Bonnie, Discovering Scraps


Another year, another fabulous Bonnie Hunter mystery quilt!  Believe it or not, just three short years ago, I really didn't even know who Bonnie Hunter was!  Well, that's not quite accurate.  I had seen her scrap-busting block designs in magazines, but, since I had never been a fan of scrap quilts, I glanced over the pattern, thought, "that might be cute, if it wasn't so scrappy" and moved on to the next quilt.  Boy was I missing out!  I had no idea how much fun making scrappy quilts could be! 
 
  Let me explain.  I learned to quilt back in 1991.  I started the way some quilters start, with a beginning quilting class at a local quilt shop.  Our assignment each week was a block that used a different technique, and at the end of the class we had sampler.  We began with choosing fabrics.  I had no stash.  I didn't know what a stash was.  I went through the shop, chose a white on white for the background, a mauve, a country blue, and a dusty purple.  When that quilt was finished, I did not like it!  I sold it to my aunt for my cousin for her birthday, because my aunt was sure she would love it!  So, enter the next 25 years of my quilting journey.  Very few quilts were made because I was working full time and raising two kids.  Finally, in 2007, I quit teaching, my kids were mostly grown, and I had time to pursue quilting.  I picked up where I had left off.  When I wanted to make a quilt, I chose a pattern, bought the exact right amount of fabrics, and made the quilt.  There was very little fabric left over.  I didn't care.  I couldn't imagine what I would do with scraps!  In fact, if I did accumulate more than one container of leftover fabrics, I donated them.  Why would I need scraps???

  Enter, new friends.  Guess who they loved?  Bonnie Hunter of @quiltville_bonnie.  They were lucky enough to get into a quilt retreat in Sioux City with Bonnie Hunter, and they invited me!  I didn't know much about Bonnie, so I googled her, bought a couple of her books, and began my journey into using scraps.  That retreat was so much fun!  Bonnie was a wonderful teacher.  She is a giving, open, humorous woman.  I thoroughly enjoyed every minute of her trunk show and the two days of classes with her.  I also began to notice that, unlike me, the other ladies were using fabrics of all kinds in their quilts.  My fabrics were yardage that I bought for the class.  The other quilts were interesting, while mine seemed a bit lackluster.  Hmmmm....I was learning something about using fabrics of similar color and value in order to add interest to my quilts!

  The next year was the year Allietare came out.  I wasn't sure.  I didn't have scraps.  I saved the patterns but didn't make the quilt.  When the reveal happened, I was so sorry that I hadn't made the quilt!  So, when En Provence began, I was ready!  I had slowly accumulated more of a stash and more scraps.  I quickly realized that I don't buy enough lights for my stash (a problem I have since corrected!).  I followed along, and made the half size.  My quilt turned out beautifully!

  This year, Bonnie has treated us to On Ringo Lake.  When the colors came out, I loved them.  But, I determined to use as much fabric from my stash as possible.  I wanted to use my scraps.  I wanted to do what Bonnie does and create from the discarded and unused pieces in my containers.  So, I switched the salmon to pink because that's what I had.  I did use a line of fabric that I had in my stash with lots of yardage, so it isn't as scrappy as it could have been.  I discovered that I could pull browns and pinks from my bins and mix them in with the yardage that I already had.   That discovery is a long way from my old formula of one single fabric for each element in the block...and, for me, that is a great discovery!

http://quiltville.blogspot.ca/2018/01/mystery-monday-link-up-part-6-7-8-9.html 


Wednesday, January 3, 2018

Starting the New Year off Right

  2018.  It's a new year.  Where do we go from here?  Something about the change of the calendar from December to January causes many of us to have a renewed sense of purpose.  We feel ready to start over: ready to set goals, and confident that we can achieve those goals.  
  So, as a quilter, how do we go about setting and achieving those goals?  I do tend to get quite a bit done each year, and I have a few small suggestions of things that I like to do to get going in the new year.

1.  Straighten up your space!  Lots of people can work in chaos.  I am not one of those people.  Even if you are one of those people, your sewing area can be more functional if it is at least organized so that you can find whatever you need to have to work on your projects.  Nothing is more frustrating, or annoying, than looking for a tool, ruler, fabric, pattern, etc. and not being able to find it!  "I know I have that...somewhere."  is a sad statement.  Inevitably, if you give up looking and buy another...you will find it!  Don't put yourself through it!  "A place for everything, and everything in its place" is a well known and oft used phrase for good reason!  

2.  Focus your attention!  If you are like me, you have A LOT of unfinished and unstarted projects.  It can really be overwhelming sometimes!  A few years ago, a friend started a Facebook group for her quilting friends, and I was blessed to be included.  One of the fun things we do in that group is pick 12 projects for the year, label them 1-12, and each month someone draws a number.  That number is your focus for that month.  I started out that first year picking my OLDEST projects.  I wanted to clear out some of those things that had been sitting around a while.  It was amazing how much I got done that year, and I've never looked back!  Each January, I choose projects to focus on for the year.  Now, I just label them by month and don't use the number system because I am involved in several groups that do this.  It got too confusing for me to keep track of which number was for which group!  I have included a picture of my projects list for the first half of 2018 so you can see what I mean.

3.  Join a group that encourages you!  Like I said, my friend Anna's group was really my first experience with social media in relation to my quilting.  I found it was so much fun to see what others were working on and to be able to share my work with others.  I know for a fact that I would not have completed nearly as many projects without the encouragement and interaction from that group of ladies!  Last summer, I decided to start my own group.  My group is called Sewing with Sandi and was started as a way for me to interact with even more quilters from around the world.  It is an open group, but in order to join, you must be a quilter with a Facebook page that actually has evidence that you do quilt.  You must also answer a couple of questions in order to be approved.  Search for quilting groups on Facebook, and you will find all kinds of groups from wool applique to modern quilting.  Join several and see how much encouragement you find within the group.  You can always leave if you don't enjoy it.

4.  Remember that the goal is PROGRESS!  I don't put pressure on myself to FINISH everything on my list.  That would be stressful, and I do this for fun!  My goal is always just to work on that project (or those projects) during that month.  When the end of the month comes, if I am close to finishing I will carry over into the next month and finish.  If I am not close, I put it away and work on the next month.  The reason I have two or three listed each month is that I get bored easily, and, also, if I finish something, I can move on to the next thing on the list.  Try to make some progress each week on your chosen goal.  It makes a huge difference!  Last year, I simply wrote Bonnie Hunter down in three or four of the months.  I have several of her quilts in progress, and when her name came up, I worked on one of those quilts.  I actually finished two of them last year.  This year, I hope to finish at least two more of hers before I take class in October with her!  My point is this:  if you have something you really want or need to finish...write it down a couple of times.  Nothing says you have to have exactly 12 items or that you have to finish within one month.  Some projects are bigger than others.

  Like I said, I do finish a lot of projects each year.  These four items help me to do that.  I hope they help you, too.  Happy quilting, and I'd love for you to join Sewing with Sandi!